
FAQ
Project.
Dent fix 101
By
Ron Conlon
Email: rconlon@ou.edu
By
Ron Conlon
Email: rconlon@ou.edu
FAQ Project. |
Dent fix 101 By Ron Conlon Email: rconlon@ou.edu |
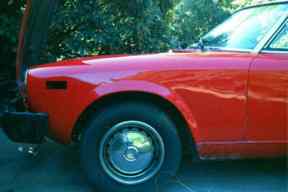
 The before fender |
|||
 |
|

|
|
 This was the calling card of someone who drove away
thinking that I would not notice the scratch. As you see
it is folded, stretched, bent and scratched. The dimples
just left of the door seam are from a previous repair where the
door had swung wide and filler was applied. After considering
the option of fender replacement, I was advised that I could do
this myself with perseverance and some effort at a reasonable
cost. I wanted to do the work with the fender on the car
since removal and welding might just as well replace it or the
lower part. These are fine options, too, and were my fall-back
plans.Pulling dents and first grinding tools This was the calling card of someone who drove away
thinking that I would not notice the scratch. As you see
it is folded, stretched, bent and scratched. The dimples
just left of the door seam are from a previous repair where the
door had swung wide and filler was applied. After considering
the option of fender replacement, I was advised that I could do
this myself with perseverance and some effort at a reasonable
cost. I wanted to do the work with the fender on the car
since removal and welding might just as well replace it or the
lower part. These are fine options, too, and were my fall-back
plans.Pulling dents and first grinding toolsThe first part was hard. I had to get a slide hammer and drill holes to pull out the dent. This is basically a sheet metal screw on a shaft, which contains a weight that slides back to the handle to pull on the screw and the dent. I made over 50 holes to rough shape the fender and even hammered some back with a light hammer using many small taps. The holes will help the filler to bond as well. The shape should be such that less than 1/8 inch of filler should be needed to re-form the skin. More filler can chip out but this is how the cheaper shops would do it. They would slap on the mud thickly and it would look fine for a while. The really good body man will have the shape pulled and hammered almost to original. I got close.That straight body line (left/right in the photo) is important to remake. This will show if poorly done. |
|---|
 Shaping |
Grind off all the paint and filler to the metal and 2-3 inches into the good part of the work. I mean all and in the low spots, too. Filler will work best on clean metal and you need to work into the good part. I used a big angle grinder and wire brush on a drill. It looked better already to me. Be careful not to grind through the body. Tap in the high spots with light hammering. |
 Grind to metal |
 First filling and sanding |
Now it is time for filler. Bondo products are fine but should be fresh and new. Buy new applicators and a pallet board to give yourself every opportunity for success. The filler hardens in seconds so slap it on in broad strokes and since it sands easily, you can do many repeats of slap and sand. I used 80 grit sandpaper dry on a drill attachment to shape the filler. The stuff can be shaped almost immediately. |
 Later stage filling sanded with the rotary sander |
|
Get the best sand paper and change it often, you will thank yourself. Only slap on nice soft filler and discard, as it gets hard. You have many choices of filler and some don't need hardener and some use UV light so you can work them more before they set. Check on your options. This was the slowest part of my job since I only worked a few hours each weekend. I must have repeatedly sanded off most of the filler 6 times over 6 weeks but each time was an improvement. There is very lightweight filler called icing and other names to finish the filling and hide irregularities that should lead to the last skin and smoothing. I waited two weeks for the stuff to set and shrink before the sanding to 600 grit and then 1000. For this sanding use a block and water. These are hard rubber blocks and about 4 X2 inches. You need to buy the sand paper to match the type of block. This was in flat sheets for me. The block will give a flatter surface and needs to be used in long strokes, not circles if possible. This is most important to remake the straight lines on the car. The hand can feel imperfections that the eye will miss so run your hand over the work often. Feel for roughness or waves. Do the whole fender wet with 600 then 1500 grit. |
||
 Whole fender sanded and some primer applied |
My friend
has a big compressor for the next steps but spray cans are okay
for primer coats. Again there are lots of choices for primer
types but one with lots of body is helpful. Your parts
shop should be helpful. Ask which shop is the most experienced
in selling auto paints to get good advice. We sprayed on
a primer and I sanded it to 1500 grit three times until the filler
and paint stopped bleeding through the sanding. It was
amazing to me how many imperfections were in the good areas.
A light coat of black spray paint that is then block sanded with
1500 will show low spots where the sanding won't reach.
Fill these with the filler that comes in a toothpaste type tube
and needs no hardener. This is for touch ups of all the
little imperfections. Give another coat of primer to get
the whole area of the dent and the whole fender one color.
You should see no difference where the filler was cut into the good area. More toothpaste for little holes/scratches and some more spot sanding. This stuff is primer red so you can paint over it. There was very little filler on the finished surface since 99 percent was removed by sanding. |
|
 Icing covering the whole area to be fine sanded and mostly removed |
 All one color of primer |
 Sanded and touchup filler |
|
There are lots of choices for primer and you must get one compatible with your paint but also some cover more thickly than others and can be block sanded to fill small imperfections. Some are better at sticking to steel and others are better for aluminum. All sanding is wet sanding at this point. Wet sanding keeps the paper from gumming up with the dust. The area is washed and dried and then wiped with mineral spirits before applying any subsequent primer coats.
|
||
 Applying primer |
 Final stage of priming and getting close |
 The first coat of color ran and was done over The first coat of color ran and was done over |
Choose the best paint to get the best finish since the cost of cheap paint is only $10-20 less per quart. Dupont single stage was my choice to match the car. Getting the right color took two tries, for me, and staring at hundreds of paint chips until I saw them in my sleep. The ones with holes in the middle were best to slide the gas filler cover under to match. Go into the sun to recheck the match in that light. Electronic scanners help but the dealer probably won't guarantee anything, if they help at all, since they are not applying the paint. I am told that paint shops blend the new color over the old for as much as 2 feet to hide differences in color matches. Now it is time to paint. Wipe the fender with mineral spirits to clean, say a prayer and have someone experienced with the paint gun shoot your car. Long even strokes of the sprayer with the paint, reducer and hardener properly mixed to a blood consistency. Do one light coat and then a wet coat. Let dry and do another and another. This art takes experience that you can learn by making errors or just get help. Clear coat is a different technique but both should be color sanded with 2000 grit to remove the bugs and dust specks after 1-2 weeks to set the paint. That is why the extra coats are necessary. Points to remember are: use fresh filler, paint and materials; get the best materials; use as little filler as possible; any mistakes can be redone or covered; mask the car with care to prevent over spray and it is body work work work. Finally if you do too good a job the rest of the car will seem dowdy and you will be doing the whole car next. |
|---|
 The final paint yet to be color sanded |
The paper is wrapped several times about the stick and is flipped often, cleaned in the water and torn off to get a fresh surface. An experienced hand is good so practice on your parts car to get an even surface and get a feel for the job. You don't want to cut through the new paint. Your fender will look all dull again. Time to buff it. The buffing is also done in 3 stages using polishing compounds of decreasing coarseness. An electric variable speed rotary buffer is used. Slower speeds will prevent cutting through the paint. The coarse compound is applied using a sheepskin pad and the finer with a sponge type pad. Done right this should give a show finish. If you skip straight to 2000 paper and buffing you get that factory finish that won't make the rest of the car look dowdy. I did my final buff by hand with 3M polishing compound and a soft cloth. The color initially seems lighter than original but this seems to be getting darker with age and waxing. |