Installing an air conditioning system in a Fiat Spider is not exceedingly complicated or difficult. An individual with reasonable mechanical skills and some basic knowledge about AC systems can successfully install a system that will be superior in efficiency and operation to those installed in these vehicles when they were originally sold. High quality components are available from a number of suppliers at reasonable prices. Aftermarket systems are common among the custom car and hot rod set, and you'll find a wealth of information on the websites of the vendors who sell and manufacture the kits. Only basic tools are required except when crimping the hoses and fittings and when evacuating and charging the system. Those two operations in my opinion are best left to your local AC shop, as the cost is minimal compared to the cost of acquiring the specialized tools.
You can click on most of the pictures for larger versions
There is an aftermarket kit available through one of our vendors (Vic Autosports). It is manufactured by a company in Texas called Factory Air Corporation (http://factoryairconditioning.com). I believe they were the original designers of the AC systems for Fiat Spiders. I have not seen this kit so I'm not qualified to comment on how well they operate. I do however believe the condensers to be slightly smaller and the compressors less efficient than other available components. Most vendors will sell you a complete kit with everything you need to install the system including hoses, fittings, grommets, etc. Some of the largest suppliers of aftermarket AC systems include:
Nostalgic Air Products - This is the company I used. They have a great selection, quality parts, next day shipping, great prices, and fantastic technical support from Jon, the owner. Highly recommended. http://www.nostalgicairparts.com
Vintage Air - Probably the industry leader for aftermarket AC kits for the hot rod crowd. They've been around for a long time and have an excellent catalog with great explanations of AC systems and their operation. http://www.vintageair.com
Old Air Products - Specialize in Chevy's but have a large selection of aftermarket products and a very good online ordering system. http://www.oldairproducts.com
Classic Auto Air - Claim to be the world's largest supplier with 28 years in the business. Specialize in Fords. http://www.classicautoair.com
Hot Rod Air - The name speaks for itself. http://www.hotrodair.com/
Arizona Mobile Air - Lots of specialized parts and equipment at very competitive prices. http://www.ackits.com/
Basic AC System Operation
There are several basic components that comprise an automobile air conditioning system; the condenser, compressor, compressor bracket, drier with safety switch, evaporator, and finally the hoses and fittings. The following are some considerations when selecting the major components in your system.
Condenser - The condenser is mounted in front of the radiator and is perhaps the single most important component to consider when assembling your system. The condenser has to be large enough and have enough air flowing through it to condense the refrigerant adequately. The old condensers used in the R12 system installed by Fiat will not be sufficient to properly handle the demands of the newer HFC-134A systems. A high efficiency 12x20 inch super flow condenser can be had for a little over $100 and it will fit perfectly in the existing space in front of the radiator. The key is to get as much air as possible moving through as much condenser surface area as possible.
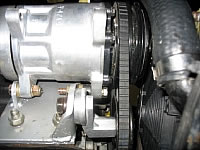
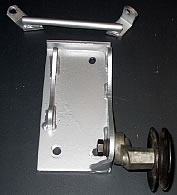 Compressor and Bracket - Compressor brackets for the spider are no longer available, and used brackets are becoming difficult to obtain. If you purchase a used bracket, be sure it includes the eccentric/idler pulley and the additional bracket that connects from the engine mount to the compressor. Your only other option is to have one fabricated by a local metal shop. Although there are a number of different compressor manufacturers, Sanden compressors fit fairly well and are very efficient. I used the Sanden 709, (about $200). It is possible that the Sanden model 505 compressor will fit the bracket better and be every bit as efficient. Check different fits with your supplier. Plan on spending some time shimming the compressor to the bracket with washers since the new compressors are slightly larger than what was originally used. Be sure to use high strength Grade 8 hardware. Bigger is not better in the world of compressors. Too much pressure may actually reduce the efficiency of the condenser. Therefore I recommend leaning toward smaller rather than larger. Even the 709 might be on the larger side.
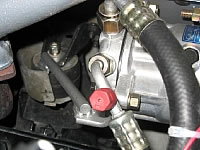
Drier/Safety Switch - The drier mounts between the condenser and evaporator and includes a safety switch. The switch monitors pressure and cuts off the compressor if pressure exceeds safe limits on the high side and also cuts off the compressor if there is a loss of refrigerant and pressure drops to levels that might damage the compressor. The drier and switch are about $30.00.
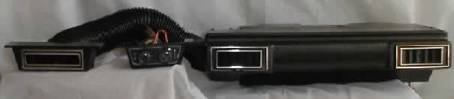 Evaporator - The evaporator is the unit that actually mounts inside the vehicle and through which the refrigerant passes. Space is limited in the spider and you'll need to be careful in selecting this unit. There is only about 18 inches of space to work with underneath the passenger side dash. I installed an aftermarket unit from Nostalgic Air Products (model UD - 160) that is almost identical to the evaporator installed by Fiat. The unit comes complete with wiring harness, three speed fan switch, thermo-switch, and remote driver's side vent and costs about $225.00. Remember, in order for the AC system to work properly, it has to remove heat from the passenger cabin faster than it can be added. Insulation in the firewall, transmission tunnel, floors, doors, etc. will go a long way in making the system more efficient.
Points to Consider Prior to Installing AC
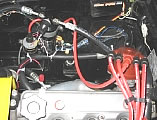
Spider cooling systems are sometimes prone to overheating, even without the additional demands of running a compressor and installing a condenser in front of your radiator. For peace of mind, it is recommended that the existing radiator and fan system be upgraded. Aftermarket 4 core radiators are readily available and a high efficiency 16 inch Spal fan will fit perfectly and mount easily in the existing space. As for the thermostat, no modification is necessary. Some individuals advocate switching from the external thermostat used on later model spiders to the "in head" system used on earlier vehicles. There's no real data to support that changing the external thermostat to the older system will yield better results. In fact, a number of individuals who've made the modification report higher running temperatures. The modification will free up space in the engine compartment but the benefits appear to be primarily cosmetic.
Installation
 Step One:
Begin by draining and removing the radiator. Remove the front grill. Be sure to place screws and fasteners in zip lock bags and mark accordingly. Jack the car up and place on jack stands. Remove the glove box door and the internal "box" itself. You'll need to do this to gain access to the cross brace to install the evaporator. Remove the passenger side carpet and insulation. Lay out all the parts to your project to make sure you have everything you need for the installation.
Step Two:
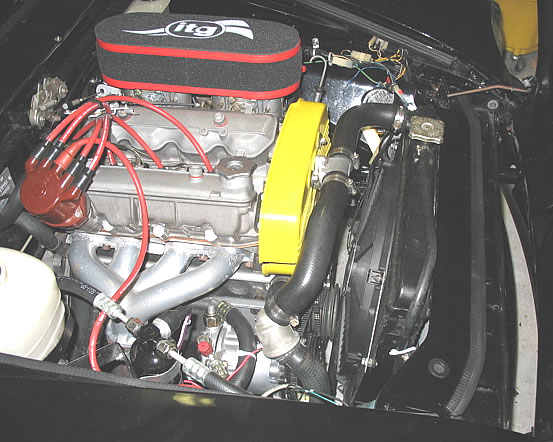
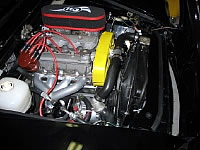
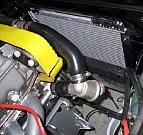 Take the condenser and place it in front of the radiator. Do not attempt to install the condenser behind the radiator. Airflow is insufficient. If you have the 12x20 inch version, insert through the grill opening in the front of the vehicle and secure in place with mounting brackets and sheet metal screws. The condenser fittings should be on the passenger side of the vehicle. Mount the compressor bracket to the passenger side of the engine block via the two studs and the upper mounting bolt. There is a spacer that must be inserted between the bracket and engine block for the upper bolt.
Step Three:
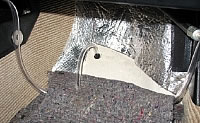
Drill two 1 1/4" holes in the firewall next to the condenser. These will be used to route the hoses to the condenser so be careful in your placement. You'll want to leave some room to bend the hoses toward the fittings. Drill two additional 1 1/4" holes in the firewall on the passenger side. The holes should be as far to the left as possible and below the coolant overflow bottle in order to better fit the evaporator. Be careful not to drill the holes too low or you will have problems installing the carpet later. Also, be sure to use grommets to protect the AC hoses from the sharp metal edges and provide insulation from engine heat.
Step Four:
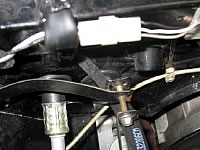
Mount the compressor into the compressor bracket, being sure the eccentric/idler pulley, crank pulley and compressor pulleys all line up for the v-belt. This is critical to avoid belt slippage or even a broken v-belt over time. Be sure to attach the stabilizer bracket to the compressor and engine mount. This bracket is essential to distribute the high torque loads generated by the compressor. You'll need to purchase a standard v-belt from a local auto parts store. It should be 30 inches but measure the distance to make sure. You will also need to remove the alternator belt in order to gain access to the rear groove of the crank pulley. Once the compressor belt is in place, tighten the idler pulley to the appropriate tension and reattach the alternator belt. Mount the drier and safety switch somewhere between the firewall and condenser, being sure the word "IN" printed on the drier is facing the front of the vehicle.
Step Five:
Lay out the hoses and cut them to size, being sure not to cut too short. At this point you'll want to test fit the hoses and tape the fittings in place for the AC shop to crimp. These hoses are thick and 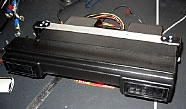 do not twist easily so be sure the fittings are in the proper position. Take the hoses to a local AC shop or auto parts store. This is cheap and can usually be done the same day. Attach the hoses to the evaporator, drier, and compressor and run them through the firewall to attach to the evaporator. Be sure to install the appropriate size "O" rings to ensure a leak free system. Prepare the evaporator with the expansion valve and insulating tape according to the instructions provided with the unit.
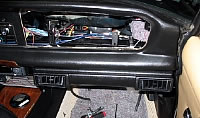 Mounting the evaporator requires patience and persistence. Before mounting the evaporator, attach the hoses you ran through the firewall. It's a tight fit and access to the mounting brackets is limited. In order to facilitate installation, you can fabricate a simple bracket from a piece of aluminum, then used heavy duty hose clamps to secure the evaporator to the cross member support that runs behind the dash. The "L" brackets on the side of the unit can then be adjusted with the mounting bolts. I had to shave some of the plastic on the side of the center console in order to get the evaporator to fit. Given the variances in fit and finish of these older vehicles you may or may not need to do the same. Any plastic that is removed is covered by the evaporator unit and will not be visible.
 Step Six:
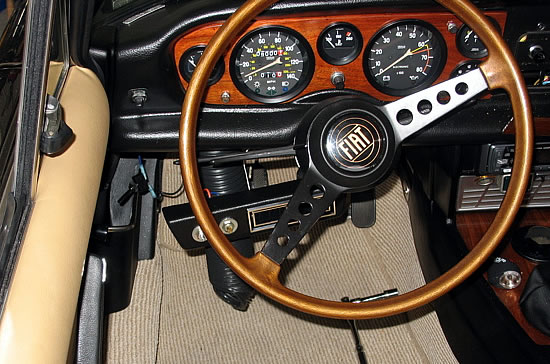
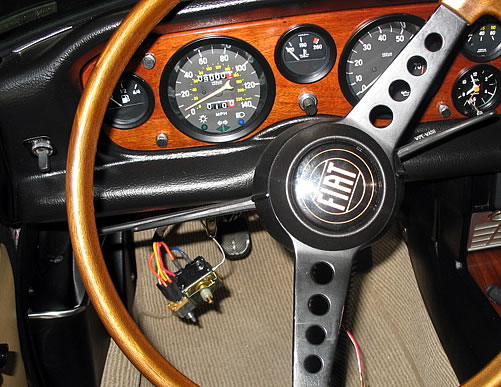
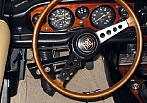
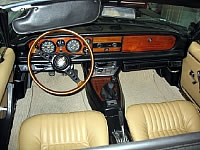
Attach the vent hose to the rear of the evaporator unit, run the hose behind the heater core to the driver's side, and up into the dash behind the gauges, and down the left side of the steering wheel. You'll need to lower the steering wheel and remove the four screws that hold the gauge cluster in place so you can position the vent hose. This is a VERY tight fit so take your time routing the hose so it does not tear or puncture.
Step Seven:
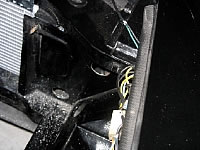
 Route the three speed fan switch wiring harness and temperature switch from the left side of the steering wheel over to the evaporator unit being careful to tuck the wires behind the dash. The temperature switch has a long metal wire that must be inserted into the evaporator unit and two jumper wires that attach to the fan switch. The probe end of the wire should be inserted at least four inches into the evaporator coil. Attach the male and female ends of the evaporator harness and switch harness. There will be a blue power wire that must be routed through the firewall and attached to one of the two open wires of the safety switch on the drier. The other wire attaches to the compressor wire. Once the switches are in place, mount the switch/vent pod underneath the dash and mount the switches to the pod. Attach the vent hose to the vent. Attach the power wire to a hot source triggered by the ignition switch and be sure to ground the evaporator unit to the vehicle with the black ground wire attached to the unit.
 Step Eight:
Turn the ignition to the point where power is on and test the fan switch. At this point you should have power to the blower. Attach the drainage hoses to the evaporator unit. Drill a 3/4 inch hole in the floorboard for the drain hoses to route to the outside of the vehicle. Replace the radiator and fill with the proper amount of coolant, being sure to eliminate any air pockets in the system. It is critical that your cooling system is working properly to avoid over heating.
Step Nine:
At this point, you are ready to take the vehicle to a certified AC shop to have the system evacuated and filled with refrigerant. In order to do the job properly, the system must be put under a vacuum and hold the vacuum for a minimum of 30 minutes to ensure a leak free system. At that point, the system can be filled with refrigerant. The cost should be about $70.00. Once you're sure the system is fully operational, replace the dashboard trim, glove box, and grill pieces previously removed. Congratulations! You now have a state of the art AC system that will keep you cool throughout the summer.
Back to the Mira FAQ Project