 FAQ Project. |
124/131 Transmission Swap Author: Matt Webb
Email: MattWebb502@yahoo.com
|
Date: 10/07/2005
Subject: Fiat 124, Installing
a 131/Brava 5 speed transmission.
Resources: Mirafiori forum
members and first hand experience.
Forward:
This
write up covers my personal experience with installing a 131 transmission into
my 1975 124 Spider. The information here may not pertain to other types and
years of the 124. All I can offer is that this information probably holds true
for all CS1 and up chassis. As always, YMMV.
Intro to 124 and 131 transmissions:
The
124 5 speed gearbox is notoriously weak and sensitive. When upgrading your
power, the stock gearbox is the first weak link in the chain. The gears and
sleeves are known to fail under elevated power conditions.
They
also contain brass faced shift forks (debatable) and brass synchro rings. These
were ok when new, but after 20+ years of service they tend to be worn. To make
matters worse, common EP gear oils are corrosive to these parts and quite often
have been run in these transmissions for long periods of time. The result is a
poor shifting (grinding, hard engagement) transmission that can refuse to stay
in gear. Even after a rebuild you can expect to have problems unless every
component related to the problem area has been replaced and all specs have been
checked.
This
is frustrating. If you decide you need a replacement transmission, the
affordable route is to get a used one -- this is a big gamble. It has been my
experience that used 124 transmissions are a waste of time and money. It seems
the only reliable solution is to do a FULL rebuild or to buy a new replacement
transmission, both are expensive options.
There
is another option however, the Fiat 131/Brava transmission. To start, these
transmissions have been known to stand up to 400 wheel horsepower! They come
with steel synchro rings, and no brass bits. They have a reputation of being
stout, reliable, and maintenance free. Change the oil periodically and go.
There
is one common failure mode I’ve heard of, and that is with the reverse idler
gear. Apparently they can crack and make noise when going in reverse. I’ve been
told that this can be avoided by coming to a full stop before putting the car
into reverse.
There are two common types of 131 transmissions. The later type, which uses a “guibo” or rubber flex joint like the 124, and the early type which uses a splined slip yoke on the output shaft. This document will only cover the late style flex joint 131/Brava transmission. These are rumored to be ’76 and up.
 I dug this picture up that
Jon Ranney posted to the forum some time ago. Odd 131 shifter.
I dug this picture up that
Jon Ranney posted to the forum some time ago. Odd 131 shifter.
The differences:
-
slightly different
ratios
-
no interchangeable
internal parts
-
different clutch forks
-
slightly different bell housing
size
-
different shift housings,
different shifter placement
-
different overall length
-
131 gasket set is cheap!
-
131 has steel synchro
rings, 124 are brass
The similarities:
-
same bell housing bolt
pattern, bolts right up to block
-
same input shaft splines
-
same pilot bearings
-
same throw out bearings
-
same starter provision
in bell housing
-
uses same size rubber
flex joint “guibo”
Drive Shafts:
Because
the 131 transmission is longer than the 124 unit, the driveshaft will need to
be addressed. The front section will need to be shortened to fit. If
you obtain an automatic transmission 124 drive shaft you can use it. The front
section is the correct length for a 131 transmission swap, and the rear section
is also the correct length if you are running a late style rear end. This is no myth, I have done it myself. If
you are running an early style rear end, you can marry the front half of the
auto trans driveshaft with the rear half of the early driveshaft. See my 124
rear end swap faq for details.
The
131 transmissions yoke extends 95mm further than the 124 transmission yoke. The124
automatic transmission driveshaft has a front section that is 100mm shorter
than a standard 124 driveshaft front section. If
you cannot locate an automatic transmission driveshaft you will need to make
measurements and have your driveshaft shortened. The easiest way to do this
would be to set the 124 and 131 transmissions side by side and measure their
lengths. Subtracting the 124 length from the 131 length will give a very exact
number. For good measure you could shorten it a little bit more, and let the
splined section on the front shaft take up the slack.
 Thanks Curly for this shot.
Here is a driveshaft that has been shortened by the required 100mm. Looks just like an auto trans 124 front section.
If you
wind up with balance problems with the driveshaft, Allen Lofland had good luck
and fair prices @ http://www.drivelineshop.com/intro.htm
I have a sneaking suspicion
that they could do the modifications for you too.
One
other option I have heard mention of is mixing and matching 131 and 124
driveshaft sections. I don’t know the truth behind this.
What about the shifter?
The
stock 131/Brava shifter and housing will put your knuckles into the radio console
when selecting 1st, 3rd, and 5th gears. With
some creative bending it appears that this could be resolved. Really this is
unexplored territory for me, but I do know that others have done it with
success.
One
interesting idea that came up a while back was to graft a 131 shifter and a 124
shifter together. To my knowledge this has never been done, but it certainly seems
like a possibility. You’d better be good with cutting and welding though! This
arrangement does have a drawback. All the gears in the shift pattern would be
reversed! In other words, 1st would be where 2nd is
supposed to be.
The
other solution is to obtain the rare “Abarth” shift extension from outside the
US. Pick a country where the “131 Racing” (or in the UK “Mirafiori Sport”) was
sold. These came standard with the Abarth shift housing fitted. This special
shift housing is an extension; much like the ones fitted to the 124, and will
bolt right on to the 131 transmission. Not all have Abarth cast into them.
In a
124, this will place the shifter at the ashtray, which is pretty close to
stock. Stock shifters, keep in mind, came out in front of the ashtray but were
bent backwards some.

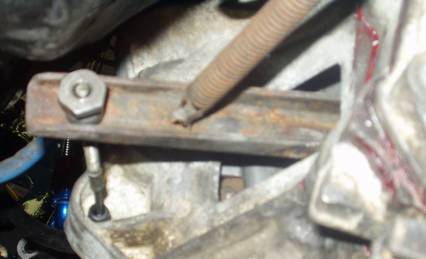
Here’s a snapshot of my 131
remote shifter. The shift lever does not appear to be stock.

Here’s another shot of one of
these “Abarth” extensions. Notice that this one doesn’t have “Abarth” cast into
it, and has a slightly different design as well. Thanks Curly for the pic.
If
you can locate one of these, you’ll likely have to buy the transmission that it
is attached to. Most people seem to be unwilling to sell them separately, but
I’m sure they’d be glad to sell you both and only ship you the shifter!
It
is possible to shorten the Abarth shift extension to cause the shifter to
protrude in the stock 124 location. However, it is not possible to simply cut
the appropriate amount and weld back together without forfeiting the shift rod
seal. I talked to someone once who modified theirs to maintain stock shifter
location and the shift rod seal, and they said that basically they had to make
a whole new front section from scratch – apparently this was very labor
intensive.
I’ve
also heard rumor that the Fiat 132/Argenta has a 131 box and a shift extension
much like the Abarth one.
For
further details, Scott O’Brien posted some pics and measurements I took of
my Abarth 131 shift extension.
http://www.mirafiori.com/~sobrien/abarth/Abarth.htm
The transmission mount:
This
is easy. Use the stock 124 mount cross member, and fit a stock pre 1983
131/Brava manual transmission mount. The cross member will bolt to the rear set
of studs on the body. A 124 mount WILL NOT FIT. This is a rumor!

Thanks Curly for this
snapshot of a stock pre ’83 131 manual transmission mount mated to a 124 cross
member.
In
the case that the mount is not available, you can cut, grind, weld, and drill a
124 mount to fit. It’s not that hard to do. Also you will need to grind a
little of the 131 case for a proper fit. I would advise doing the measurements
for this with the transmission in the car and supported by the engine and a
jack.
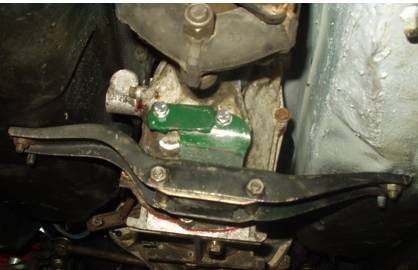
I’m embarrassed of this one. Here’s
my Franken mount. It’s a cut and welded 124 mount. It’s uglier and stronger
than it looks from this angle. Afterwards I learned that early 131 trans mounts
bolt in. They are NLA with some US vendors, but can still be found. Cross
member is stock 124, and it lines up perfect with the rear set of studs on the
body. Hey my cross member is in backwards! Oops.
The flywheel, clutch, clutch
fork and cable:
The
131 clutch fork must be used. It will fit the car without problems. It will
accept a 124 throw out bearing.
The
stock 124 clutch cable is used. Well, that’s what I’ve been told. I’m having a
slight issue with mine. It’s not long enough to fit with some play between the throw
out bearing and the clutch. Not sure what the solution will be.
The
late style (large) flywheel and 215mm clutch are used. This will require the
appropriate starter as well. If your car has the later clutch and flywheel
already, your starter will work.
For
a period up until somewhere with the 1756cc engines, the large flywheels came
with 10mm bolts. Later versions (late 1756cc and up) moved to 12mm bolts. So if
you do need to convert to a large flywheel, pick the flywheel that will bolt to
your crank.
A
124 bell housing WILL NOT bolt to the 131 box. This rumor has floated around in
the past as a way to maintain the smaller clutch and as a way to help avoid
tunnel modifications. Same goes for the idea of putting 131 gearbox internals
into a 124 box --- this is NOT a possibility.
Here you can see the 131 fork
easily clears the body (on install I thought I was going to have problems). Also
in this shot you can see the 124 clutch cable fitted. Note that in my case
there is no jamb nut in place and at this adjustment level the throw out bearing
is making contact with the pressure plate. Instead of a jamb nut I might try
something like safety wire to keep the nut from backing off.
Other people report no
problems.
A few words about clutch
cables.
-
The 131 clutch cable is
of a different design with adjustment at the firewall and will not fit the 124.
-
The clutch cable used is
the 1971 and up 124 clutch cable. Coupes and Spiders seem to have the same part
number all the way to the end of production.
Transmission tunnel
modifications:
There
is a rumor out there that you can take 131 internals and put them in the 124
box to solve the following issues. This is BS!
Under
the heater core box are two large dents in the transmission tunnel sheet metal.
From my experience, it is not imperative that you remove these. For optimal
clearance, they can be removed, as the 131 bell housing gets awfully close to
them. Simply cut out the area and weld new sheet metal in place. It will take
some forming of the new metal to get a good fit, as the tunnel is curved. This
will not interfere with the heater box.

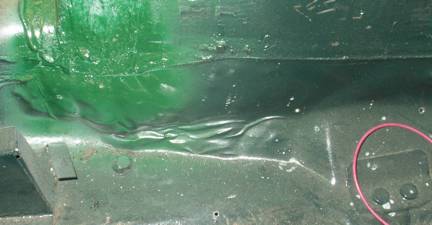
Yeah the paint is a poor
match. Here you can make out the new sheet metal that has been welded and seam
sealed into place.

Curly’s work is starting to
really make mine look awful!
The
other major concern is proximity of the rubber flex joint “guibo” to the transmission
tunnel on the passenger side. It is best to put the transmission (fitted with
the guibo) in place to observe this first hand. Mark the area that will need to
be modified, and remove the transmission.
This
should be the only time you have to dummy install the transmission. I advise you
do this without even a flywheel fitted, but with a pilot bearing in the crank.
This will make the process easier. It is also a good idea to clean up the input
shaft and lube it well. Same goes for the bell housing / block dowels.
Considering that you’re putting a transmission into a car that it doesn’t
belong in, you should be happy that you only have to do one mock up.
Once
removed, you have two routes you can take to modify the transmission tunnel:
sledge hammer, or cut and weld. I always thought I’d go the cut and weld route,
but in the end I chose the sledge hammer route. The clearance you need to gain
is not that major, and you can actually achieve clean results by pounding the
crap out of the metal. It’s quick too!

This picture shows pretty well
where the sledge hammer did its job.

This picture shows the trans
tunnel and passenger floor pan. It’s obvious where the extra clearance was
needed. For a reference point, off to the right you can see the two trans mount
studs.
Here you can see the optional
welding route for providing extra guibo clearance. Thanks again Curly.
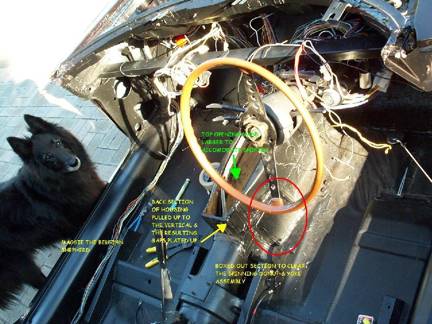
If
you are running a 131 Racing Abarth shift extension, you will need to make a
few more mods. Grind the seam sealer off of the joints at the end plate of the
transmission tunnel. This will expose the spot welds. Chisel them apart. Now
you can bring the back plate to vertical. In my case, this left enough metal to
just re-weld the joints.. no real fabrication required! Peer down in and at the
back of the shifter tunnel you will see another piece of metal that is
protruding out ¾” or so. Cut on each side, and hammer it flat.
The
old stock shifter access panel can get tossed out. You will need to open up the
top of the trans tunnel quite a bit, so you will also be fabricating a new
cover plate. Cut out enough material to allow the shifter to be installed and
removed from inside the car. Otherwise, you’ll have a heck of a time trying to
fit the transmission and shifter in place as one unit. You’ve got to enlarge
the opening anyways, may as well make servicing easier while you’re at it. See
the pic above for an indication of how big you should make the new access hole.
Fabricate
a new cover plate. I did this with the inner shift boot in place. Use a piece
of paper to make a template. Copy to sheet metal and cut. This will take some
creativity on your part.

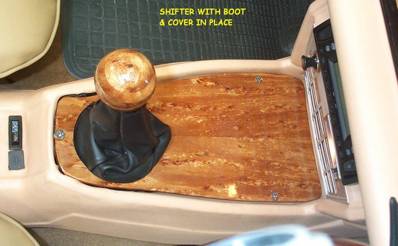
Here’s the finished product.
Back section brought back to vertical and welded, front area cut out and new
steel welded in, new cover mounted in place. Black tarry/silicone type gunk was
used to seal the cover plate, nothing permanent. Foam gasket tape probably
would have worked fine.
Getting the Interior to look
good:
Sorry, I haven’t crossed this
bridge yet. Curly has though!
Here are pics.

Gear Ratios and Speedometers
Before
you read this section, let me warn you that it doesn’t lead anywhere
conclusive. Don’t expect an easy magic solution to your speedometer troubles,
because there isn’t one. The good thing about this section is that it does
bring together many important and hard to find details regarding gear ratios,
rear end ratios, and speedometer drives. I believe everything I’ve put into
this section to be accurate; if anyone has any corrections please email them to
me.
Note that the ratios here
cover US market models, and ratios could be different for other markets.
Transmission gear ratio table:
Gear |
124, to 1978 |
124, 1979 & 1980 |
124, 1981 on |
131/Brava, 1975 to 1979 |
131/Brava, 1979 up |
1st |
3.667 |
3.612 |
3.667 |
3.612 |
3.612 |
2nd |
2.100 |
2.045 |
2.100 |
2.045 |
2.045 |
3rd |
1.361 |
1.357 |
1.361 |
1.357 |
1.357 |
4th |
1 |
1 |
1 |
1 |
1 |
5th |
0.881 |
0.830 |
0.881 |
0.870 |
0.834 |
Reverse |
3.244 |
3.244 |
3.244 |
? |
? |
Just because transmission ratios are close (or in the case of ’79 and ’80, VERY CLOSE) doesn’t mean that the speedometer will be accurate. What’s real important is what the rear end ratio and tire size was for the vehicle that the transmission came out of.
Below is a chart of 124 and 131 rear end ratios. It’s a little bit of an odd layout, but it keeps years, models, and ratios accurate.
Model Year |
124 Manual |
124 Automatic |
131 / Brava Manual |
131 / Brava Automatic |
1967-1970 |
4.10:1 |
NA |
NA |
NA |
1971-1974 |
4.30:1 |
NA |
NA |
NA |
1975-1977 |
4.30:1 |
NA |
4.44:1 |
4.44:1 |
1978 |
4.30:1 |
NA |
4.44:1 AND 4.1:1 |
4.44:1 |
1978.5 |
4.30:1 |
NA |
4.1:1 |
4.44:1 |
1979 up |
3.90:1 |
3.58:1 |
3.58:1 |
3.58:1 |
Tire size:
Changing the Speedometer drive:
Contrary to popular belief, speedometer gear reduction is not handled inside the gear drives bolted to the side of the transmission. Simply taking one from a different rear end ratio car and bolting it to the transmission will do no good. These speedometer drives all have a 1:1 ratio.
Speedometer reduction is handled with the exposed gear on the speedometer drive unit and the worm gear that is internal to the transmission. Because of this, it will do harm to your transmission to try to swap over a speedo drive without also swapping over its matching internal worm gear in the transmission.
Taking these speedo drives to get “calibrated” is nonsense for our FIATs.
To the best of my knowledge 131 and 124 drives and gears are, unfortunately, not interchangeable. Someone PLEASE correct me if I’m wrong. I think the drives will bolt up, but I don’t think the trans gears are interchangeable.
The speedo drives are color coded, and this will indicate what rear end the transmission is set up for.
124:
Red = 4.3:1
Blue = 4.1:1
White = 3.9:1
??? = 3.58:1
131:
??? = 4.44:1
??? = 4.10:1
??? = 3.59:1
I have two questions that no one seems to know the answers to:
My favorite method for this is to use the road side radar speed indicators. Every time I see one of these I hold steady throttle/speed and check what it says against my speedometer. I have found them to be very reliable.
Here are some options for solving speedometer issues:
http://www.speedometersolutions.com/
- Figure out what your actual speed is when your speedo indicates 50 MPH
- disassemble the speedo, move and hold the mechanism in place so that it reads 50 MPH
- adjust needle up or down to read what your previously recorded actual speed was.
Care must be taken while doing this. Don’t expect totally linear results here. That’s why I mention Photoshop. This can get you more in the ballpark with your speedo though if you pick a speed that you typically drive your car to calibrate against.